
Sedona has become one of the top tourist spots in the American southwest over the last decade. When you see the red rock formations and explore some of the caves, you will quickly understand why people from all over flock to this stunning destination. Nowadays, thanks to Instagram you can view some of Sedona’s most popular spots from the comfort of your couch. But who wants to experience some of Sedona’s best hiking from their couch? Not you, of course, that’s why you’re here!

There is so much do and see in Sedona, so no matter how long you’ve planned for your trip, it will definitely be an adventure to remember. If you are looking for great hikes to take in all of the views, here are some of my favorite hiking trails that will give you great pixel perfect photo ops.
Before you head out and explore the beautiful hikes, be sure you check if you will need a parking pass. Much of Sedona is in the Coconino National Forrest, so you will need a pass to park your car. Some parking lots provide a place to purchase a pass but many do not. Be sure to check out pricing and acceptable passes before you go.
Seven Sacred Pools via Soldiers Pass Trail

Seven Sacred Pools is a great hike to start your Sedona adventure. It is rated easy on AllTrails and is great for all levels of hikers. As you’re driving to the trailhead, you might think you’re in the wrong place. You navigate through a neighborhood and are surrounded by houses. But then once you park your car, you are immediately immersed into the wonderful red rocks.
The “pools” are more like large puddles, or holes if you visit when it is dry. That being said they are still beautiful and you can capture a pixel perfect shot. If you are able to, try and catch a reflection of the background in the pools.
After making a pit stop at the pools, I recommend continuing on to the Soliders Pass cave spur. This definitely adds a little extra adventure to this hike! However, it does increase in difficulty as you hike to the cave.
The spur is just barely marked, you just have to keep your eyes for the sign marked on the tree to your right (coming from the seven pools). Once you reach the entrance to the cave, just be patient as there is only one way for people to climb up and down. It is definitely a little awkward climbing into and can get crowded easily. Just be patient and courteous in order to keep you and others safe.
How to get there: I recommend following the map on AllTrails down Soldiers Pass Road. Parking is VERY limited at this trailhead as there are only 14 spaces in the parking lot. There is a gate that opens at 8 am and I recommend arriving at least 30 minutes early if you want a spot. Otherwise you have to park about a mile from the trailhead. There are other trails that lead to the Seven Sacred Pools trail, it will just add miles to your hike.
Trail Details:
Distance- 2.8 miles out & back
Estimated Time- 2-3 hours
Elevation Gain- 541 feet
Check out the AllTrails app for more specific trail details & maps.
Brins Mesa Loop
Brins Mesa Loop is a great trail to help you get away from some of the crowds in Sedona. We started from the Seven Sacred Pools Trailhead, continued to Soldiers Pass and then followed Brins Mesa Loop. If you include the Soliders Pass cave spur, this can create a bit of a journey but definitely doable. If you complete the loop counterclockwise, it can be a bit more difficult as it is steep and you are climbing up rather than down the more difficult sections.
There are definitely many places to stop and take in the 360 degrees worth of views. Along the top part of the mesa, there is a giant rock and you will notice a path leading to it. You are actually very close to being on top of the Soldiers Pass cave at this point. I highly recommend climbing to the top of the rock and soaking in the pixel perfect views! Since this loop is long, it would be best to complete this hike in the morning in order to avoid being out in the heat of the day.
Alltrails maps this hike at 5 miles, however when adding the cave spur, we mapped it as a 7.2 mile trip. With this is mind, be sure you are well prepared and have plenty of water.

How to get there: I recommend following the map on AllTrails down Soldiers Pass Road. Parking is VERY limited at this trailhead as there are only 14 spaces in the parking lot. There is a gate that opens at 8 am and I recommend arriving at least 30 minutes early if you want a spot. Otherwise you have to park about a mile from the trailhead. There are other trails that connect to Brins Mesa Loop, it will just add miles to your hike. Other parking options at the Jordan trailhead.
Trail Details (just the loop alone):
Distance- 5 mile loop
Estimated Time- 3-4 hours
Elevation Gain- 836 feet
Broken Arrow Trail
Broken Arrow Trail is another popular hike in Sedona that is great for all skill levels. If you are anything like me, you are hoping to avoid the crowds. But at the same time, you also want explore and see what all of the hype is about for these popular hikes. I hiked this trail late afternoon and found it to be less crowded and more enjoyable.
Along the hike, you will see (and hear) Jeeps and ATVs having fun on their tours. Some might feel this takes away from the peace of being out in nature, but again if you go at a less popular time it shouldn’t be too much of an issue.
Be sure to have a trail map or download one on AllTrails as the trail is not well marked in some places. You might end up having to backtrack a couple of times.
When you reach the end of the trail, there are various places to get away from the crowds to snap your pixel perfect shot from various perspectives. In my experience it was VERY windy so be prepared to hang onto your hat. I might have had to chase after mine! The hike back was the most stunning. If you’re hiking later in the day, you will get to experience the sun setting and hitting the red rocks. You are really able to revel in your surroundings. Be sure stop often and soak in all of the beauty Sedona has to offer. Even better, pack a snack or lunch to help you refuel and take in the views.
How to get there: Head south of Sedona on 179 then west on Morgan Rd. There is a short drive to the entrance that is not paved and might be a little rough on low clearance cars. That being said there were all types of cars in the parking lot. Just take it nice and slow use your best judgement if you are uncomfortable. There is spaces prior that you can park and walk the unpaved road to the trailhead.
Trail Details:
Distance- 2.8 mile out and back
Estimated Time- 1-2 hours
Elevation Gain- 400 feet


If you are more into Rocky Mountains than red rocks, check out our 10 Ultimate Hiking Trails in Banff You Have to See.
Fay Canyon Trail
Fay Canyon trail was a pleasant unexpected surprise hike. Full disclosure, we did not plan on hiking this trail when planning our trip. However, this trail was recommended to us by many locals. It was short and rated as easy on AllTrails so we ended our day with this hike. The bonus to beginning your hikes early or late in the day sometimes allows you to miss most of the crowds.
The trail follows along the valley floor for a majority of the hike and is flat and well marked. There is a side spur that takes you to Fay Canyon arch, which is worth checking out if you are up for some elevation gain and a little bit of scrambling. If you aren’t afraid of heights, once you reach the arch, there is a small trail off to the right that will take you to the top of the arch. Please be safe and use your best judgement. We saw a group of hikers taking their small dog along this path which I do not recommend.
Once you get back to the main path, you will continue hiking until you can’t go any further. I’ll admit, the end of the trail is not quite what you hope for as it is just a bunch of large boulders. However, as many people mentioned to us, once you reach the end, climb up the rocks and you will get a stunning view of the canyon you just walked through (see the picture below). Even though you are “climbing” up, I did not feel unsafe as there were no steep drop offs until you reached the top.
I highly recommend this hike if you are looking for a more casual, less strenuous hike but still wanting that pixel perfect view.
How to get there: Head west of Sedona on 89A and turn right on Dry Creek Rd. This will turn into Boynton Pass Rd. Turn left and look for the Fay Canyon parking lot. Trailhead will be across the street from the parking lot.
Trail Details:
Distance- 2.6 mile out and back
Estimated Time- 1-2 hours
Elevation Gain- 383 feet

Bear Mountain
Bear Mountain has a very fitting name as it is quite a “bear” to climb. This trail is rated difficult and it definitely makes you earn the gorgeous views at the top. After you cross the street from the parking lot, you are met with a steady climb not too long after beginning the trail. If you’ve ever been on a stairmaster at the gym, this hike pretty much feels like that, just with better scenery.
Many reviews of this hike mention a couple of false summits. Maybe it is because I was warned about it, but in my opinion there was only one spot I could see being considered a false summit. However, as you keep hiking, you realize there is still more mountain to climb.
I will say when I reached the supposed false summit, and saw what I still had to climb, mentally I wanted to stop. But DON’T STOP, YOU CAN DO IT! When you do reach the actual summit, there is an end of trail sign and you can soak up the spectacular 360 degree views of Sedona.
I felt the trail was well marked as long as you follow the white markings on the ground. I will admit I was a little unsure of the right direction a few times. If this happens just look around for a white marking as there is most likely one nearby. It is always best hiking practice to have a trail map and AllTrails is a great way to help you stay on track.
For this hike you definitely need to be prepared with lots of water, sunscreen, proper shoes, snacks and layers. I would recommend starting this hike in the morning as it warms up quickly.
If you are in decent shape, don’t have bad knees and are up for a challenge, this hike is an absolute must!
How to get there: Head west of Sedona on 89A and turn right on Dry Creek Rd. This will turn into Boynton Pass Rd. Turn left and look for the Bear Mountain parking lot on your left. It is past the Fay Canyon parking lot. There are a limited amount of spaces but people tend to park in the street. Trailhead will be across the street from the parking lot.
Trail Details:
Distance- 4.9 mile out and back
Estimated Time- 3-5 hours
Elevation Gain- 2,024 feet

Courthouse Butte & Bell Rock Loop Trail
Okay, I’ll say it. The name of this trail always make me giggle a little but (not butte) we’re allowed to be a little immature sometimes, right?
The courthouse loop was pleasant and another nice escape from some of the crowds. Now you might think I am lying to you when you pull into the parking lot and can’t find a parking spot. We definitely had to circle a few times. But trust me, a majority of the crowds are there to climb up Bell Rock and do not hike the full loop.
Once you start on the trail, you will head towards Bell Rock. Since this trail is a loop, you can choose to go either clockwise or counterclockwise. The trail is relatively flat most of the way but is rated as moderate on AllTrails. There are a few places that require a little bit of effort but I would rate it between easy and moderate.
This trail provides some great views of Cathedral Rock in the distance and some up close perspectives of the Courthouse and Bell Rock. Parts of the loop are also part of a bike trail so be courteous and be sure to step to the side if a biker is passing you.
Other than the struggle to find a parking spot, this was a relaxing hike that was a great end to our day. It is also a great spot to catch the sunset as we noticed many people scampering up Bell Rock as the sun was going down.
How to get there: Head south of Sedona on 179, then turn left into the Bell Rock Trailhead parking lot. The parking lot is a decent size but still usually always full. You can park at another trailhead, or be patient and circle a few times until someone leaves. Another suggestion is to always get there early and beat the crowds.
Trail Details:
Distance- 3.9 mile loop
Estimated Time- 1-2 hours
Elevation Gain- 357 feet

Boynton Canyon
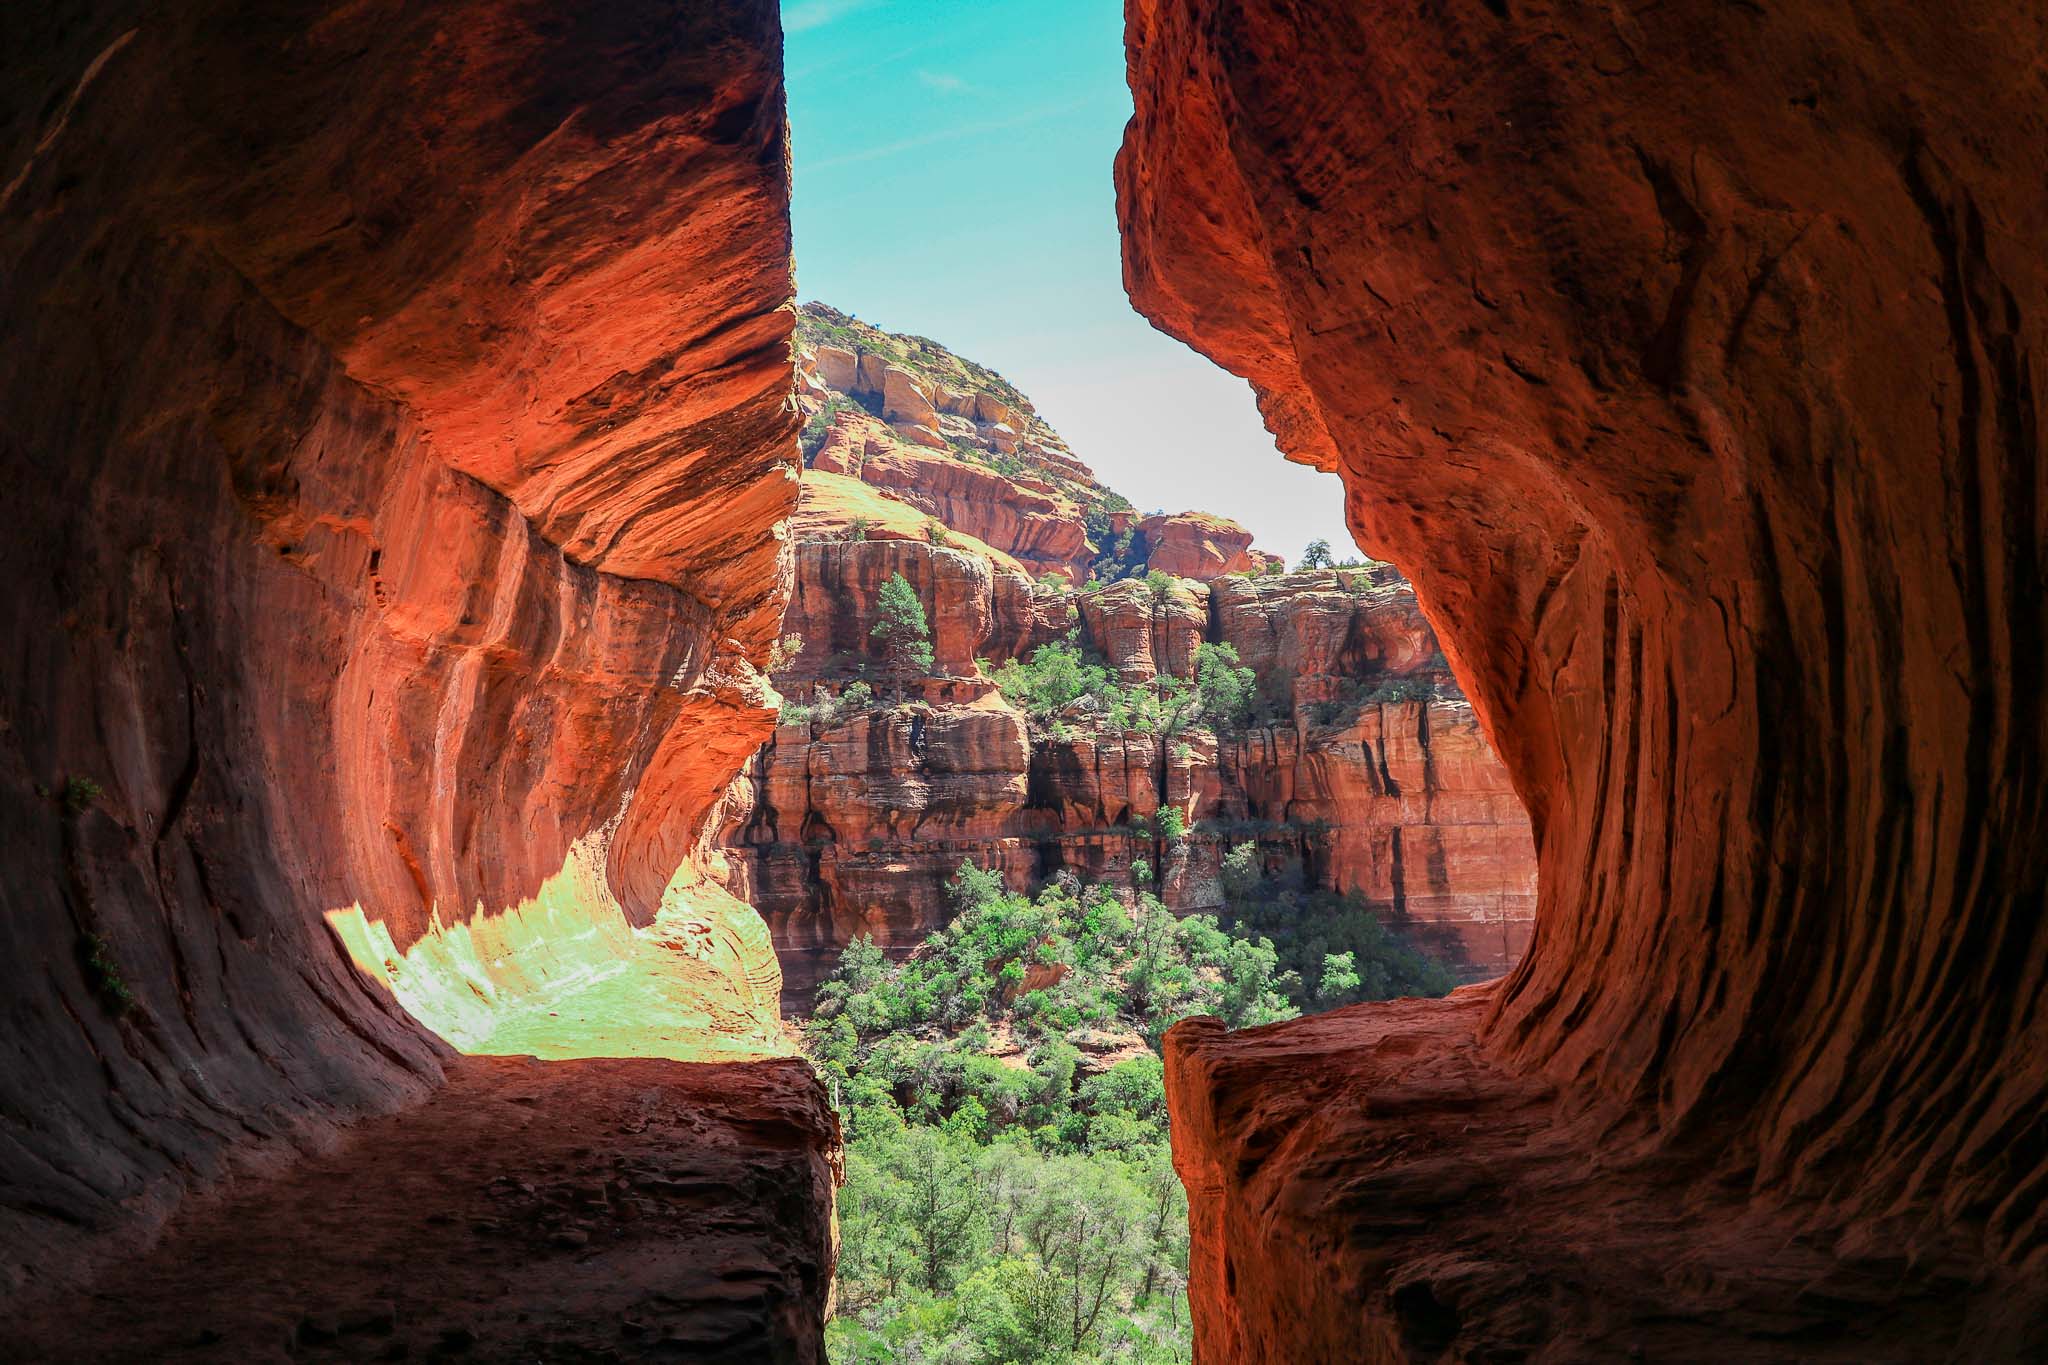
Boynton Canyon was a trail we hiked solely because I was on a mission to find a particular cave. Similar to Fay Canyon, you are hiking along the canyon floor. However, there is a bit more of an elevation change than Fay Canyon. The first part of the trail, you are hiking along the boundary of Enchantment Resort. For me, this isn’t as ideal in terms of a peaceful hike. Once you pass the resort however, you are completely surrounded by nature. This trail alone would probably not make my list, but the reason it did is because of the spectacular cave.
If you download the AllTrails map it has the spur that leads to the cave and wonderful ruins. Many people like to keep this cave a secret as they are concerned others will add graffiti or be disrespectful to the land. If we want to be able to continue to enjoy these wonderful places, please remember to leave no trace and do your part to protect these amazing gifts nature offers.
All of my pictures below are from the cave looking out onto a spur of the main canyon. If you continue to the end of the canyon. you will get to enjoy wonderful views surrounding you. Since you are in a canyon, there is not much of an “overlook” spot at the end as you might expect if you hiked to the top of a mountain or cliff.
Some reviews mention this trail is quite shady, and as I would agree there are many shady parts, there are also many exposed sections. Be sure to pack plenty of water and wear sun protection. If you are looking to hike this trail and feel comfortable navigating off of the main trail, I would definitely recommend finding this unique cave. It definitely makes the hike worth it.


How to get there: Head west of Sedona on 89A and turn right on Dry Creek Rd. This will turn into Boynton Pass Rd. When you come to a fork in the road, turn left and the parking lot will be on your right. If the parking lot is full, head back towards the stop sign as people park along the road. You can’t park along the road right outside of the entrance.
Trail Details (includes cave spur):
Distance- 7.3 out & back
Estimated Time- 3-4 hours
Elevation Gain- 1,167 feet
Please keep in mind, I am by no means an expert hiker and Sedona has hiking trails for every level of hiker. So if these aren’t for you, then don’t worry there are so many great options. I recommend visiting one of the visitor centers and asking one of their experts what hikes would best suit your skill level and interests.
Suggestions on gear to bring along
Hiking boots or trail runners– Pay attention to the time of year you are visiting and possible hiking conditions, as that might help you better determine the appropriate shoe. If you are traveling during the winter months, be sure to look into spikes or snow cleats for your shoes.
Camelbak or Nalgene– You should always be prepared and hike with plenty of water. Even if you are hiking in the cold, your body needs to be replenished.
Camera– Of course you won’t be able to capture your pixel perfect memories without a camera. Camera preference is your own, DSLR, GoPro, smart phone, etc.
Hat & sunglasses– Since you are hiking up in elevation, you are more prone to sunburn. Be sure to protect your skin!
Hiking poles– I would recommend these if you have any knee issues as they are very helpful especially on the decline of many hikes.
Snacks- You can’t forget the snacks! You use and burn more energy than you think hiking, so be sure to pack some high energy and salty snacks.
If you venture out onto any of these beautiful hiking trails or hope to one day, be sure to leave a comment about your favorite one! If you liked this post, please share with your friends and family. Also, be sure so sign up for our exclusive emails and resources.
Remember to always respect our wonderful planet, national parks and lands and leave no trace. Happy hiking!
All photos used in this post and on our website are taken by and owned by Pixel Perfect Travel and it’s owner. All photos are available for purchase. If you would like to use any photos please contact us! We appreciate everyone respecting our creative content.
We did this hike in the spring and it was amazing. I’m a 60 year old woman with some knee issues so the trekking poles were an awesome suggestion. The hike was a bit strenuous but well worth the effort.