
We’ve all been there, scrolling through Instagram daydreaming of our next adventure. Hoping to snap a photo of the stunning places we see all over our explore page. Well, chances are you were just like me and came across some of the iconic photos of Banff, AB in Canada. They’re hard to scroll past without getting a little wanderlust. Have you seen the color of the water? I am hoping since you are here, you are itching to find the best spots for those same photos and maybe even some new ones. Whether you’re here for hiking, photography locations or both, I have put together a list of 10 ultimate hiking trails in Banff, you have to see to believe.
I know, I know, you’re probably thinking everything on Instagram is edited or has filters so you shouldn’t get your hopes up too much thinking it is going to look like that in real life. Y’all. I consider myself lucky to have visited Banff twice now and let me tell you my jaw drops every time. If you are looking for a beautiful, outdoorsy and adventure kind of getaway Banff should be at the top your list.
Please keep in mind, I am by no means an expert hiker and Banff has hiking trails for every level of hiker. So if these aren’t for you, then don’t worry there are so many great options. Here are some of my favorite hikes in and around the Banff area that are sure to give your Instagram feed a stunning upgrade.
*Disclaimer: I hiked all of these trails in the early summer months so I did not need any kind of snow or climbing gear. If you are hiking during the colder months, be sure to check trail conditions.*
Check out the AllTrails app for more specific trail details & maps.
Lake Agnes
Lake Agnes trail is a great hike for all levels of hikers. Most of the trail is paved and has a steady incline to the top with breathtaking views along the way. The Lake Agnes trailhead begins on the north side of Lake Louise and is well marked. As I mentioned, the trail is a steady incline with a few surprises along the way. Be sure to take in the stunning views of Lake Louise and it’s turquoise water especially at the beginning of the hike. Other bonus points along this trail are a few smaller lakes and a waterfall. The best surprise of all… the Lake Agnes Teahouse at the top with a spectacular view of the valley below and of course, Lake Agnes. Who doesn’t want tea (I prefer the hot chocolate) and cookies after a hike?
The tea house is pretty small, so unless you hit it at the right time, it can be pretty crowded and hard to find a table. The first time, we got hot chocolate to go and enjoyed our tasty drinks on some of the benches around the lake with some friendly chipmunk friends. The second visit, we caught them right before close and had no problem finding a table. The Tea House is only open from June until Canadian Thanksgiving and you won’t need your credit card as they only accept cash.
How to get there: Parking is available in the Lake Louise parking lot. You can’t park in the Fairmont parking lot unless you are a guest. My advice if you don’t want the headache of finding a parking spot, come EARLY. The trailhead will be to the right when facing Lake Louise towards the forest.
Trail Details:
Distance- 4.6 miles out & back
Estimated Time- 2-3 hours
Elevation Gain- 1,427 feet

Little Bee Hive
Little Bee Hive was surprisingly one of my favorite hikes in Banff. The trail starts out at the same trailhead as the Lake Agnes trail, so the first part is well paved & heavily trafficked. After you pass Mirror Lake, you will want to keep your eyes open for the Little Beehive cutoff. There is a sign that marks the trail and you will veer off to the right. This part of the hike is not paved but the trail is well marked and easy to follow. It is a steady incline to the top so those of us not used to high altitude will definitely need to take a few rest stops.
Once you reach the top, you will realize your hard work was well worth it! You have the most stunning views of Lake Louise, the Fairmont Chateau Lake Louise and the incredible Canadian Rockies. If you’re brave enough, be sure to snap that pixel perfect shot standing on the rock near the edge. I can’t say I was 100% brave enough, so I settled for posing next to the rock.
How to get there: Parking is available in the Lake Louise parking lot. You can’t park in the Fairmont parking lot unless you are a guest. My advice if you don’t want the headache of finding a parking spot, come EARLY. The trailhead will be to the right when facing Lake Louise towards the forest.
Trail Details:
Distance- 5.6 miles out & back
Estimated Time- 2.5-3 hours
Elevation Gain- 1,755 feet

Emerald Lake
Emerald Lake trail can be easy or moderate depending on the path you chose. While we were there, part of the trail, the moderate section, was closed due to a recent avalanche so we only completed the loop around the lake. Whichever part of the trail you choose, the whole trail or just the loop, both start at the lake front. Part of the trail around the lake was paved and part of it is dirt (mud/slush when we went). We came across a few people swimming in the lake with their dog, so it is definitely kid and dog friendly.
The entire hike, you are able to enjoy the beautiful views of the glacial water and Emerald Peak in the background so there are plenty of spots to stop and take your pixel perfect photo.

After you park and walk towards the lake, you will come across some lodging and a cute little cafe off to the right over a bridge. Instead of going over the bridge, head to the left and just past the gift shop and restrooms, you will begin your hike. We came across more people at the beginning of the the hike but then found less people as we continued further along the trail. If you are looking for an easy, casual hike then I definitely recommend the loop around Emerald Lake.
Emerald Lake also offers canoe rentals if you find Moraine Lake or Lake Louise too busy for a canoe adventure.
How to get there: This trail is west of the town of Banff in Yoho National Park so will require a park pass to enter. An easy way to find Emerald Lake is to map yourself to the Emerald Lake Lodge . There is a day use parking lot. There will be many tour buses but don’t be discouraged by the crowds, many just come and take a photo and leave.
Book your stay at the Emerald Lake Lodge HERE
Trail Details *these details are for the entire Emerald Lake Trail*:
Trail Distance- 6.7 mile loop
Estimated Time- 3-4 hours
Elevation Gain- 1,246 feet
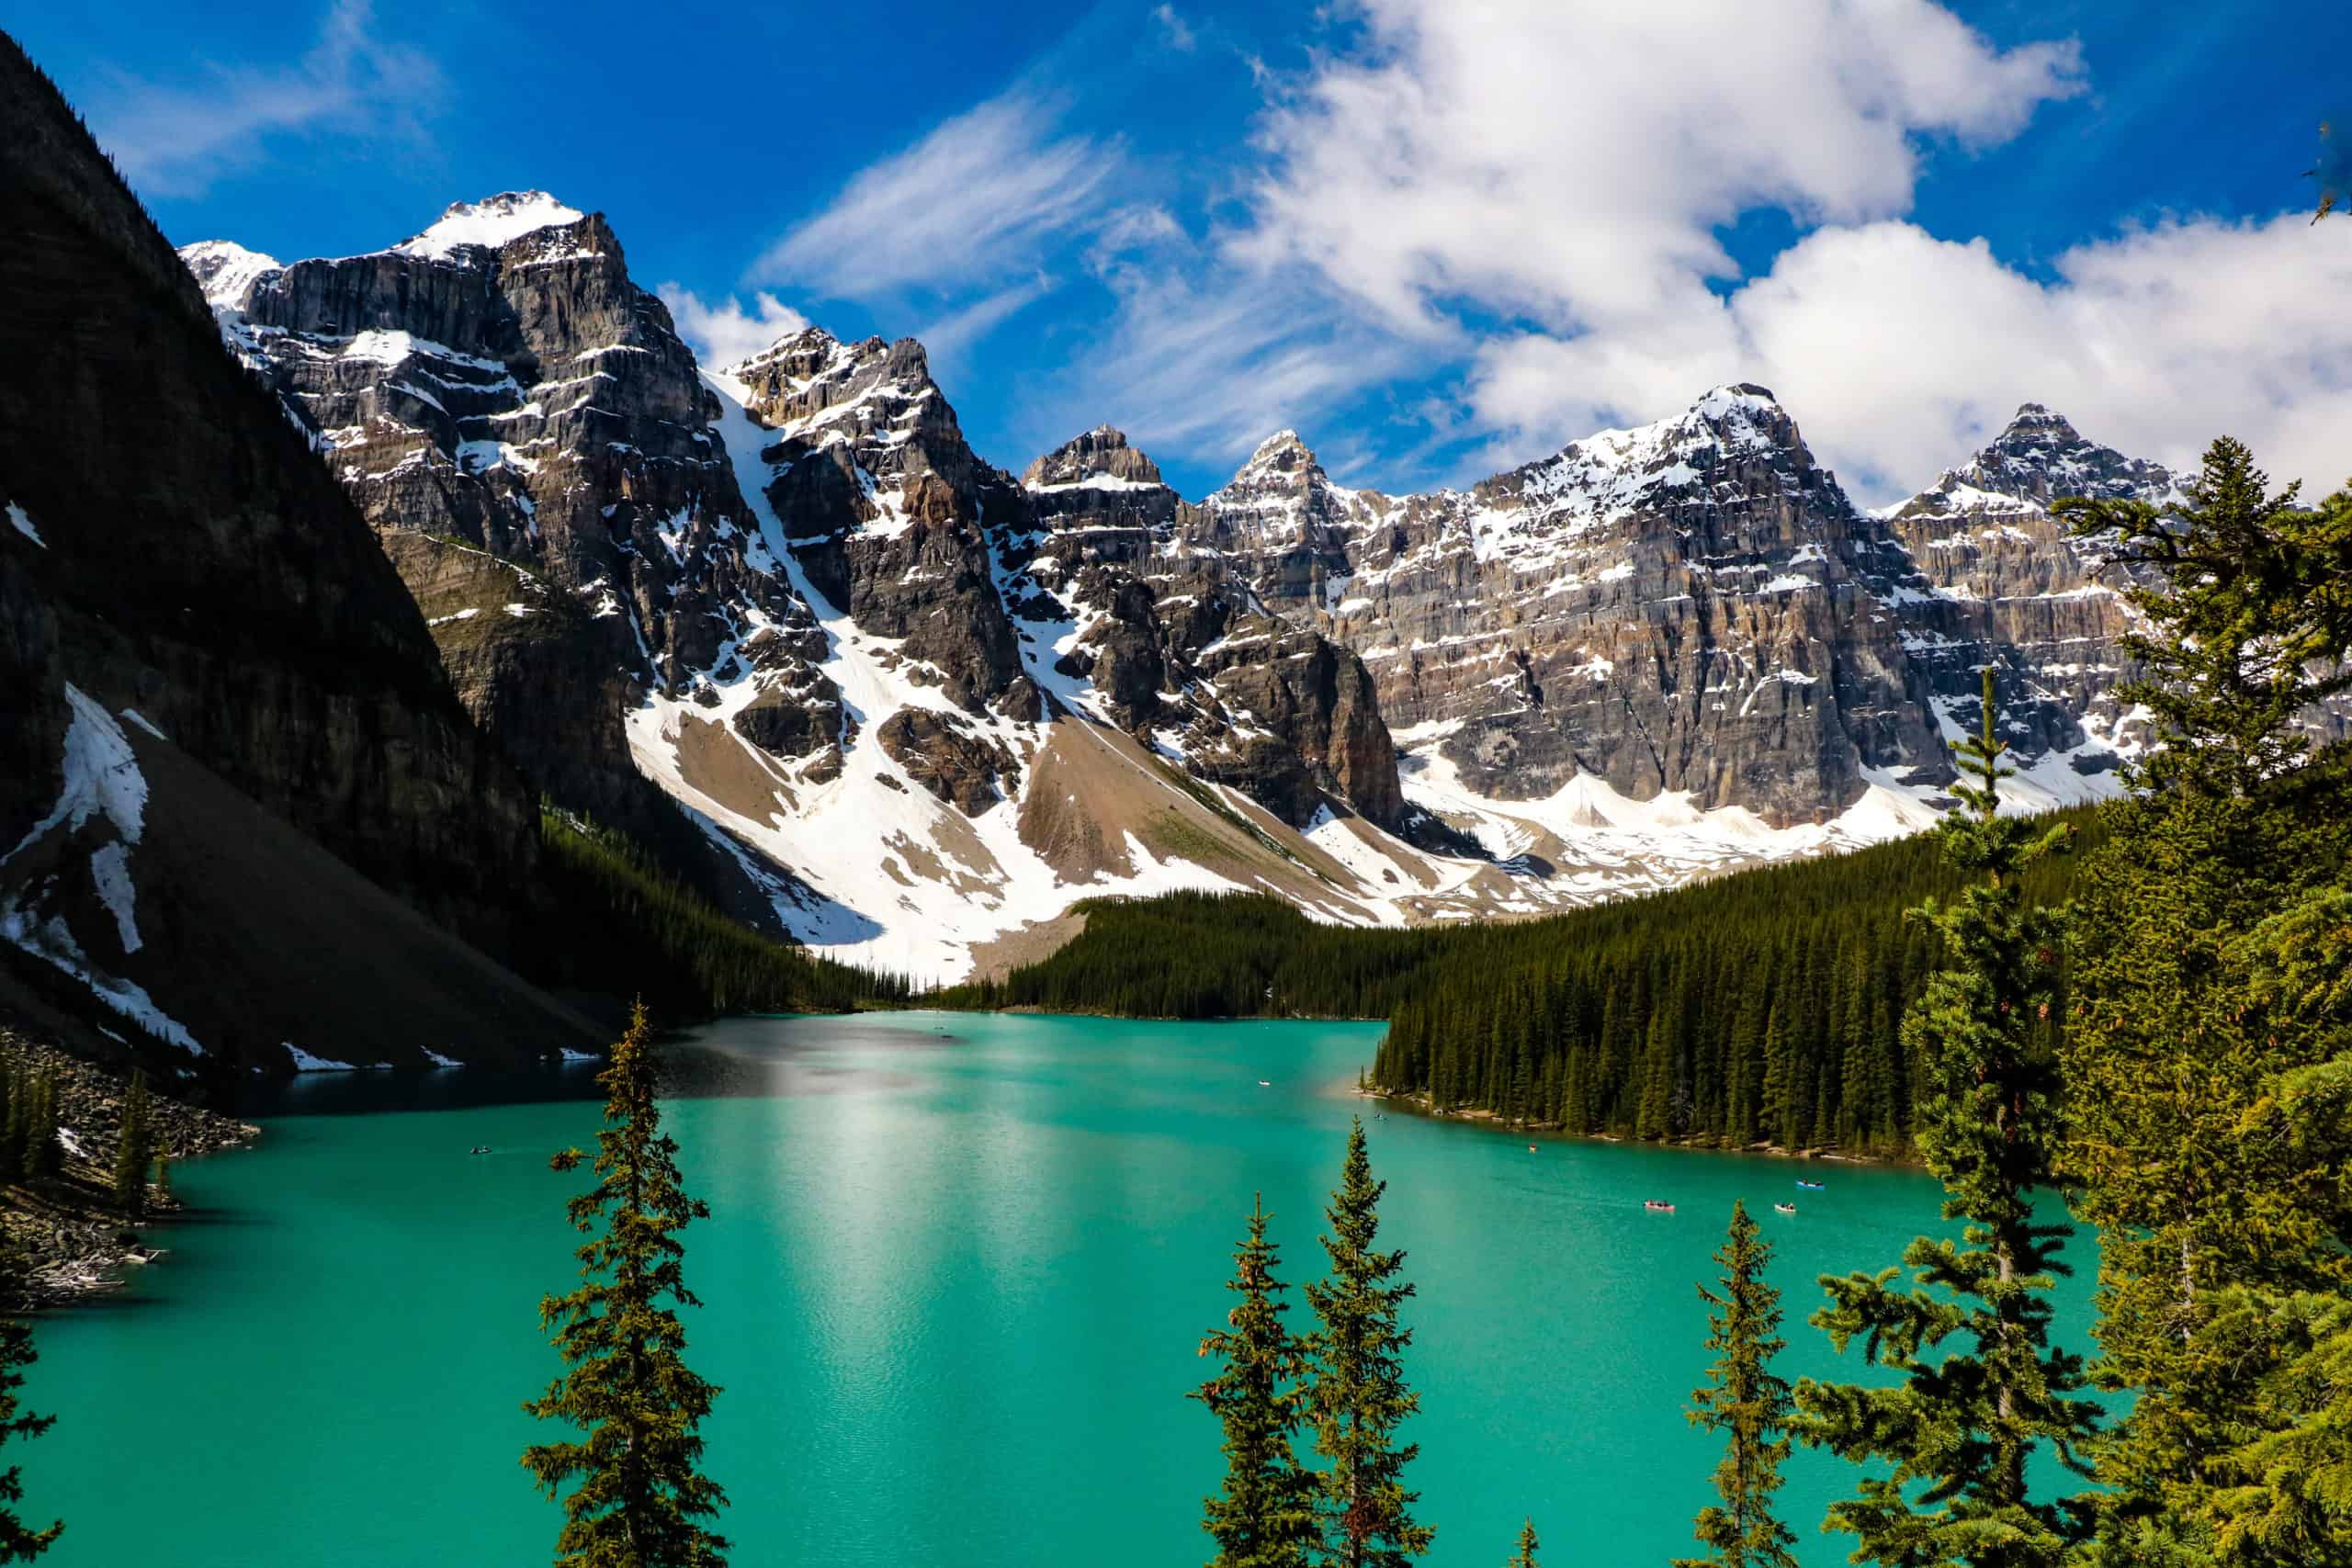
Rockpile at Moraine Lake
If you are looking for the iconic photo from Banff, the one you see all over Instagram, the one at the top of this post, this is the hike for you! This is a very quick and easy hike that takes you to the most breathtaking view. I remember seeing many photos of this place before I even arrived, and wasn’t sure if it would be a let down since I had technically already seen it… Let me assure you, it is not a let down! My jaw visibly dropped walking up to Moraine Lake BOTH times I have visited.
Okay, now for the hiking part. Once you park your car, you’ll be tempted to follow the crowds to the lake front, but instead look to the left towards the restrooms. Head that direction and you will see the trailhead for the rockpile. You will venture up a series of steps until you finally get to the viewing area.
What you don’t see in all of the photos are the loads of other people trying to capture the same photo. My suggestion is to venture off to the sides or even down below to find a more secluded spot to snap your pixel perfect photos. It might require a little climbing but nothing too strenuous. Another great way to avoid the crowds is to hit this spot early in the morning. Like 5 am early. Sunrise early. There will definitely be other people there with you, but it is a little bit more serene and can make for some epic shots (if the clouds cooperate) of the sunlight hitting the peaks.
How to get there: Parking is available at Moraine Lake, but will fill up very quickly, especially with all of the RVs. They do allow parking on some parts of the road leading up to the parking lot but it is not always guaranteed. Arrive early if you don’t want to stress about a parking spot!
Trail Details:
Distance- 0.5 mile loop
Estimated time- 20 minutes
Elevation Gain- 32 feet

Castle Mountain Lookout
Castle Mountain was definitely a trail we underestimated. It is rated a moderate trail on AllTrails but it is a pretty steady incline the entire way to the top. For someone who lives at sea level, it definitely gets the heart pumping but still very doable for beginner hikers. Compared to some of the other hiking trails, we saw very little people along this trail which made it nice and peaceful. We even had the peak to ourselves for a little bit while enjoying our mid hike snack.
Most of this trail is through the trees which is very welcomed during the summer months, but it also makes reaching the peak and seeing the view that much sweeter. You should definitely be able to take some pixel perfect photos from the lookout especially on a clear day. I also recommend taking a few panorama photos as well so you can capture the entire view.

If you have unsteady knees or prefer more support (especially on the decline) I would recommend taking your hiking poles on this trail. If you’re up for some cardio and a less trafficked trail, I would recommend this hike!
How to get there: From Banff, head north and exit to 1A Bow Valley Parkway. We were stopped and asked to show our National Park pass. A little ways down Bow Valley Parkway, you will find a small parking lot off to the right. We did not have trouble finding a space, although I imagine if the trail is crowded, it might be hard to find a parking spot.
Be sure to to keep your eyes peeled for wildlife along Bow Valley Parkway, as we were lucky enough to spy a bear!
Trail Details:
Distance- 4.5 miles out & back
Estimated Time- 3- 4 hours
Elevation Gain- 1,830 feet
Peyto Lake
Peyto Lake is one of my favorite spots in the Banff area. Yes, it is another spot you have probably come across while scrolling through Instagram. Yes, it can definitely be full of tourists looking to get that same stunning shot but I would argue it is not as busy as Moraine Lake or Lake Louise. Can you blame them (or me)? The endless view of mountain peaks as the end of the lake is breathtaking.
The hike to the viewpoint is less than a mile and paved. It does have some elevation gain but nothing too difficult. Once you get to the viewpoint, you will notice many people climb over or around to get closer photos, however I would recommend staying on the trail and marked area to help preserve the land and leave no trace. You can’t go wrong with getting your pixel perfect shot from any spot at Peyto Lake.
I would recommend stopping for this hike if you are going or coming from Jasper National Park because it is quick, easy and the view is worth the extra time in my opinion. Peyto Lake is north of Banff and Lake Louise on Icefields Parkway. Bonus, if you are anything like my dad, you’ll download the Gypsy Guide app and enjoy all of the history and interesting facts as you drive along Icefields Parkway. It even recommends places to pull off and check out if you have extra time.
How to get there: Head north on Icefields Parkway towards Jasper. If coming from Banff, you will look for the Bow Summit parking lot which will be on the left. As people are in and out of here relatively often, both times I have visited, I did not have trouble finding a spot.
Trail Details:
Distance- 1.5 miles loop
Estimated Time- 30 minutes- 1 hour
Elevation Gain- 275 feet

Stoney Lookout
Stoney Lookout is a great hike just outside of town for every level of hiker. It is a fairly easy trail through the trees to the top of Stoney Mountain. I would be sure to use a map or an app like AllTrails because there were a couple of places on this hike where it was a little unclear as to which direction we needed to go to stay on the trail. Once you reach the top, there is a natural window in the trees that allows a pixel perfect view that looks like it belongs on your desktop screensaver.

If you are looking for a family friendly, relatively easy hike or are wanting to ease into your Banff hiking experience, this is a great trail for you.
How to get there: Head north of Banff on Mount Norquay Scenic Drive. You will go up and follow a couple of hairpin turns until you reach a parking lot for the Mt. Norquay chairlift. Upon entering the parking lot, the trailhead will be off to your right in the trees.
Trail Details:
Distance- 2.6 miles out & back
Estimated Time- 1-2 hours
Elevation Gain- 761 feet
Sulphur Mountain
Sulphur Mountain is an incredible hike that provides 360 degree views at the top. This trail was recommended to us by a local and we definitely underestimated it’s difficulty. Remember we are from a city that is at sea level so elevation already adds difficulty for us and this trail has quite a bit of elevation gain. With that being said, it is definitely a doable hike even for novice hikers you just might require a few extra breaks. If you or someone in your group isn’t up for the hike, there is no shame in purchasing a ticket and riding the gondola to the top. Whether you hike or ride, the views are worth the effort (or the money).
Check out available tickets and pricing for the Banff Gondola HERE.
Once you reach the top, there are restaurants, a gift shop and restrooms. If you are up for a little extra hiking, be sure to follow the wooden path and steps to the Sulphur Mountain Cosmic Ray Station. The Cosmic Ray Station is actually a national historic site if you are into that sort of thing.
This trail, and peak, is highly trafficked but there are plenty of places to get a pixel perfect shot without having to wait for someone to get out of your photo.
If you are not up for taking the trail back to the bottom, you can hop on the gondola and enjoy seeing the hike you accomplished coming up.
How to get there: You will park in the Banff Gondola parking lot near the Rimrock Resort. Both times I have visited the parking lot has been full and we have had to find a spot on the side of the road. So be sure to either arrive early or bring your patience.
Trail Details:
Distance- 6.8 miles out & back
Estimated Time- 2-4 hours
Elevation Gain- 2,480 feet

Johnston Canyon Trail
Johnston Canyon Trail is a pretty popular trail in the Banff area. This hike is a little different than the others I have mentioned. You aren’t hiking to the top of a peak or get to see another turquoise lake. No, you are hiking to witness the powerful upper and lower falls spilling over from Johnston Creek. Johnston Canyon is also unique because the trail itself takes you along different scenery and fun bridges and walkways.
The trail is out and back so of course you can turn around after you reach the lower falls. However, I highly recommend hiking the extra half mile or so to the upper falls. When you do decide to head back, be sure to take a few moments to look back on the falls. It definitely provides a different perspective and a variety of pixel perfect photos. This is a fun hike for all levels of hikers and provides a little different reward at the end.
How to get there: Head west of the town of Banff on 1A (Bow Valley Parkway). You will head towards the Johnston Canyon campground and parking for the trail will be on your right. This is a fairly popular area for hiking and camping so parking spots are pretty fluid.
Trail Details:
Distance- 3.2 out & back to the upper falls
Estimated Time- 1-2 hours
Elevation Gain- 859 feet


Tunnel Mountain
Tunnel Mountain is a great easy hiking trail in the town of Banff. Typically we think the best views come after hard hikes, but Tunnel Mountain trail proves this theory wrong. Along the trail, you are gifted with spectacular views of Banff and the beautiful peaks surrounding the town. The trail is well marked and highly trafficked. Be sure to make pit stops along the way to take in the views and capture those pixel perfect shots. Don’t miss the opportunity to rest in the red Adirondack chairs!
Once you reach the top, there is plenty of room to find your own spot and have a snack and just enjoy the 360 degrees of beauty! Think of Tunnel Mountain as a mini mountain in the middle of town giving you a glimpse of all Banff has to offer. If you’re looking for a an easy hike for all ages and abilities, this is a great option!
How to get there: The trailhead is on the east side of town and you can access the parking lot via St. Julien Road or Tunnel Mountain Drive.
Trail Details:
Distance- 2.8 miles out & back
Estimated Time-1-2 hours
Elevation Gain- 872 feet

Suggestions on gear to bring along
Hiking boots or trail runners– Pay attention to the time of year you are visiting and possible hiking conditions, as that might help you better determine the appropriate shoe. If you are traveling during the winter months, be sure to look into spikes or snow cleats for your shoes.
Camelbak or Nalgene– You should always be prepared and hike with plenty of water. Even if you are hiking in the cold, your body needs to be replenished.
Camera– Of course you won’t be able to capture your pixel perfect memories without a camera. Camera preference is your own, DSLR, GoPro, smart phone, etc.
Hat & sunglasses– Since you are hiking up in elevation, you are more prone to sunburn. Be sure to protect your skin!
Hiking poles– I would recommend these if you have any knee issues as they are very helpful especially on the decline of many hikes.
Snacks- You can’t forget the snacks! You use and burn more energy than you think hiking, so be sure to pack some high energy and salty snacks.
If you liked this post, please share with your friends and family and be sure so sign up for our exclusive emails and resources.
Remember to always respect our wonderful planet and national parks and leave no trace. Happy hiking!
All photos used in this post and on our website are taken by and owned by Pixel Perfect Travel and it’s owner. All photos are available for purchase. If you would like to use any photos please contact us! We appreciate everyone respecting our creative content.
Pingback: 7 Sedona Hikes You Don't Want to Miss | Pixel Perfect Travel
Pingback: Epic Road Trip Through the Pacific Northwest - Pixel Perfect Travel